Enable Multi-Site on Ryax
Warning
This documentation assumes that you already have a working Ryax installation, with a public IP and a configured DNS. See <./install_ryax_kubernetes.html>`_ for more details.
Ryax is able to use multiple computing infrastructure at once, even during the single run of a workflow.
To enable the multi-site mode you will need to install a Ryax Worker for each site.
Ryax Worker currently supports two type of sites SLURM_SSH and KUBERNETES.
This document explains how to install and configure Workers.
SLURM_SSH Worker
Requirements
Because the SLURM_SSH worker uses SSH to connect to the SLURM cluster, the simplest way to deploy an SLURM_SSH worker is on the Ryax main site. So, the only things you’ll need are:
SLURM installed on the cluster
SSH access to the cluster with credentials to run SLURM commands
Pyhton3 available on the Slurm login node
(Recommended) Singularity install on the cluster to run Ryax Actions containers
Note
With the usage of custom script you can run commands directly on the cluster and avoid the usage of Singularity, but Action packaging will be completely bypassed.
Configuration
Note
You are required to install ssh workers on the same cluster and namespace that is running ryax-runner.
Ryax allows you to register one or more SLURM partitions to run your actions on. To do so, you need to define in the configuration partition name and node resources
Here is a simple example of configuration:
config:
  site:
    name: HPCSite-1
    type: SLURM_SSH
    spec:
      partitions:
        - name: default
          cpu: 16
          memory: 24G
          gpu: 1
          time: 2H
      credentials:
        server: my.hpc-site.com
        username: ryax
Each field explained in details:
site.name: the name of the site that identifies the site in Ryax
site.type: the type of the site (can SLURM_SSH or KUBERNETES)
site.spec.partitions: the partition definitions. Ryax only supports partition with homogeneous node for now. Each resource value is given by node.
name: name of the partition.
cpu: amount of allocatable cpu core per node.
memory: amount of allocatable memory in bytes per node.
site.credentials: Contains credential to SSH to HPC cluster login server.
To extract the partition information we provide a helper script to run on the Slurm login node:
wget "https://gitlab.com/ryax-tech/ryax/ryax-runner/-/raw/master/slurm-ryax-config.py"
chmod +x ./slurm-ryax-config.py
./slurm-ryax-config.py > worker-hpc.yaml
Now you can edit the file to add your credentials for Ryax to be able to SSH to the HPC loin node:
config:
  site:
    spec:
      # ...
      credentials:
        username: ryax
        server: hpc.example.com
Note
Names must be unique among worker on the main site.
The private key will be injected during the installation phase.
For more details about the Ryax Worker configuration please see the Worker reference documentation
Installation
Now you can install the Worker on the Ryax main site. To do so, we will use the configuration defined above.
Also, we will inject the SSH private key required to access the SSH cluster.
helm upgrade --install worker-hpc-1 \
  oci://registry.ryax.org/release-charts/worker  \
  --version 25.10.0-3 \
  --namespace ryaxns \
  --values worker-hpc.yaml \
  --set-file hpcPrivateKeyFile=./my-ssh-private-key
worker-hpc-1: name of the helm releaseworker-hpc.yaml: file containing the configuration of the workermy-ssh-private-key: rsa private key file that has authorization to login
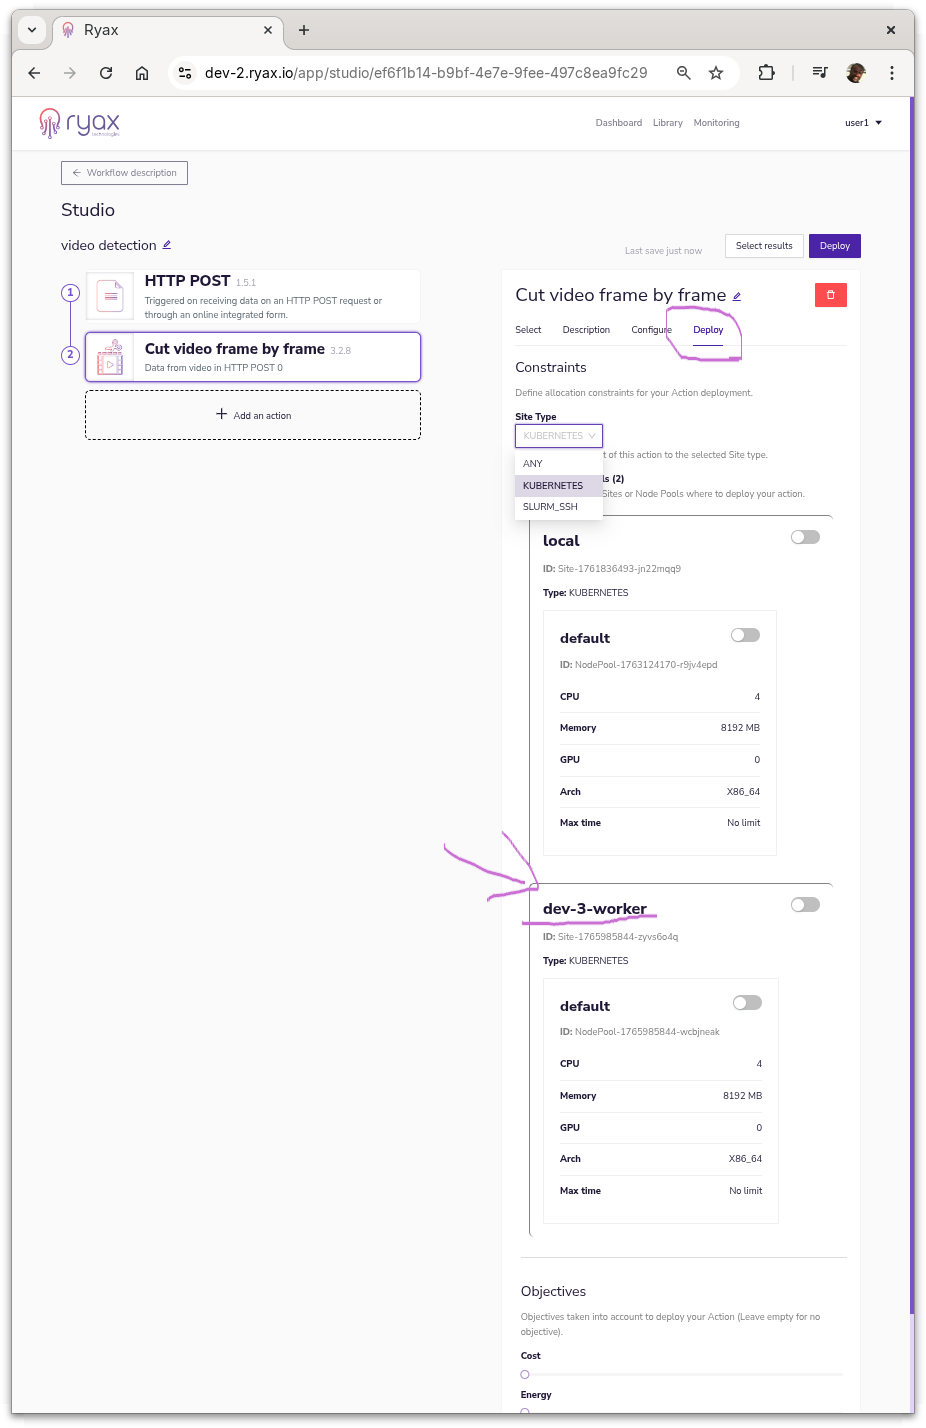
Once the worker is up and running, you should see a new site available in UI, in the workflow edition, in the Deploy tab of each action. Now you just have to select the SLURM_SSH site in the Deploy configuration to tell Ryax to execute your Action there on the next run.
If you want more control on the way Slurm deploys your action (run parallel jobs), add the HPC addon to you action. See the HPC offloading reference for more details.
Kubernetes Worker
Requirements
First, you’ll need a Kubernetes cluster, of course! Be sure that your cluster is able to provision Persistent Volumes (most of the Kubernets clusters do, by default).
kubectl get storageclass
This command should show you at least one storage class with the default flag, if this is not the case you should install one. Make sure that the storage class you want to use is set as default. You can set a storage class as default with:
kubectl patch storageclass YourStorageClassName -p '{"metadata": {"annotations":{"storageclass.kubernetes.io/is-default-class":"true"}}}'
Change YourStorageClassName accordingly.
For a simple example you can use local-path, from the Local Provisioner storage class
if available.
To install a Ryax Worker on Kubernetes we will use Helm.
Supported versions:
Kubernetes > 1.19
Helm > 3.x
Hardware Requirements:
At least 2 CPU core
2GB of memory
1GB of disk available
Note that resource requirements really depends on your usage of the cluster.
Configuration
In order to configure your Worker, you will need to select one or more node pools (set of homogeneous nodes) and give to the Worker some information about the nodes.
Note
Why we use node pools? Because it allows Ryax to leverage the Kubernetes node autoscaling with scale to zero !
Here is a simple example of configuration for aws:
config:
  site:
    name: aws-kubernetes-cluster-1
    spec:
      nodePools:
      - name: small
        cpu: 2
        memory: 4G
        selector:
          eks.amazonaws.com/nodegroup: default
let’s exaplain each field:
site.name: the name of the site that identifies the site in Ryax
site.spec.nodePools: the node pools definitions (a node pool is a set of homogeneous node. Each resource value is given by node).
name: name of the node pool.
cpu: amount of allocatable cpu core per node.
memory: amount of allocatable memory in bytes per node.
These fields might change depending on the cloud provider. Below an example of configuration for Azure.
config:
  site:
    name: azure-kubernetes-cluster-2
    spec:
      nodePools:
      - name: small
        cpu: 2
        memory: 4G
        selector:
          kubernetes.azure.com/agentpool: default
All node pool information can be obtained using a simple:
kubectl describe nodes
To obtain resources values, look for the Allocatable fields. Regarding the selector, you should find the label(s) that uniquely refers to your node pool (little hint: there is often pool in it ☺️).
For more details about the Worker configuration please see the Worker reference documentation
Once your configuration is ready save it for later to a worker.yaml file.
Preparing
For the worker to communicate securely to the main Ryax site, we need to create a secure connection access between the two Kuberenetes clusters. In this How-To we will use Skupper, but other multi-cluster network technology might work. Make sure you have kubectl access to both clusters, we are going to reference as main-site the kubernetes that has all Ryax services including the UI and worker-site the kubernetes cluster that we will attach to run Ryax’s actions.
Install skupper v2 cli, in your local machine
curl https://skupper.io/v2/install.sh | sh
main-site & worker-site
Remove skupper v1 in both sites if installed, if not you can skip this step
kubectl delete -n ryaxns deployment.apps/skupper-router deployment.apps/skupper-service-controller service/skupper-router service/skupper-router-local
main-site & worker-site
Install skupper v2 custom resources definition CRDs, in both sites
helm install skupper oci://quay.io/skupper/helm/skupper --version 2.1.3
worker-site
Create namespaces
ryaxnsandryaxns-execsrequired by Ryax on the worker-site.
kubectl create namespace ryaxns
kubectl create namespace ryaxns-execs
Configure skupper
To resume we need the worker-site to access main-site services. More precisely, we need to expose the following services:
registry: to pull action images
filestore: to read and write files (actions static parameters, execution I/O)
broker: to communicate with other Ryax services
The registry is already exposed on the internet so only the secrets are required to access it. For filestore and broker, however, we need to provide a mechanism to reach out from the worker-site. For that, we are going to install skupper in both sites and configure it accordingly to the procedure below. Note that a worker-site means the command should run on the worker-site only, likewise the main-site marks when a command must run ONLY on the main-site. All skupper cli commands will use the default kubectl configuration, so be careful to set you KUBECONFIG environment variable accordingly.
worker-site
On the worker-site, first create the skupper site, it is very important to enable link-access so it can have the services of the main site exposed later.
skupper -n ryaxns site create worker-site --enable-link-access
main-site
Second, create the skupper site resource.
skupper -n ryaxns site create main-site
worker-site
Now create the token to redeem on the main site, keep secret.token in a secure location it will work for the first attempt to connect and then be useless.
skupper -n ryaxns token issue ../secret.token
main-site
Redeem the created token to allow connection with the worker.
skupper -n ryaxns token redeem ../secret.token
worker-site
The worker site must create a listener to have the main-site broker (ryax-broker-ext) and filestore (minio-ext) services exposed on its side.
skupper -n ryaxns listener create ryax-broker-ext 5672
skupper -n ryaxns listener create minio-ext 9000
main-site
The main-site must create a connector to allow the listeners to reach its local services, note that we use
--workloadto specify the target service of the connector.
skupper -n ryaxns connector create ryax-broker-ext 5672 --workload service/ryax-broker
skupper -n ryaxns connector create minio-ext 9000 --workload service/minio
main-site
Save the secrets to access Ryax services, the secrets include sensitive information please keep this file safe and delete it as after the next step. We provide a small helper script to inject the “-ext” suffix needed for remote services mapping.
wget "https://gitlab.com/ryax-tech/ryax/ryax-runner/-/raw/master/k8s-ryax-config.py"
chmod +x ./k8s-ryax-config.py
./k8s-ryax-config.py
worker site
Install saved secrets from previous step on the worker-site (after this command it is safe to delete the secrets file):
kubectl apply -f ./secrets
worker site
Now that we have the configuration and a secure connection with the credentials we will use Helm to install the latest Ryax Worker:
helm upgrade --install ryax-worker oci://registry.ryax.org/release-charts/worker --version 25.10.0-3 --values worker.yaml -n ryaxns
That’s it! Once the worker is up and running, you should see a new site available in UI, while editing the workflow in the Deploy tab for each action (might need to refresh if the workflow was already open on edit mode).
Trouble Shooting
Container pending on persistent volume claim.
Check if the pvc was created with the correct storage class.
kubectl get storageclass
kubectl get pvc -n ryaxns
The PVC status should be BOUND, if they are not it is probably because the cloud provider require
some extra configuration to create. In our tests, with AWS it was necessary
to associate an EBS addon.
Create iam service account with the role for EBS driver.
eksctl create iamserviceaccount \
  --region eu-west-3 \
  --name ebs-csi-controller-sa \
  --namespace kube-system \
  --cluster multi-site-pre-release-test \
  --attach-policy-arn arn:aws:iam::aws:policy/service-role/AmazonEBSCSIDriverPolicy \
  --approve \
  --role-only \
  --role-name AmazonEKS_EBS_CSI_DriverRole
Then you have to create the addon associating with the account.
eksctl create addon \
 --name aws-ebs-csi-driver \
 --cluster multi-site-pre-release-test \
 --service-account-role-arn arn:aws:iam::$(aws sts get-caller-identity --query Account --output text):role/AmazonEKS_EBS_CSI_DriverRole --force
Now make the storage class the default.
kubectl patch storageclass gp2 -p '{"metadata": {"annotations":{"storageclass.kubernetes.io/is-default-class":"true"}}}'
Certificate Is Not Valid
For Ryax to have a valid TLS certificate, you need to have a DNS entry that point to you cluster. Please, check the section related to this process in the installation documentation.
You can check the state of the certificate request using:
kubectl get certificaterequests -A
kubectl get orders.acme.cert-manager.io -A